October 27th, 2009 — 9:40am
The other weekend Hayley came round to help out with ideas for the outer wallet of our invites.
We sat at the dining room table eating copious amounts of treats, (could explain why it was a maintain that week!) sticking, cutting and embossing, trying to find something that looked good.
Hayley came up with a fab idea that I loved, and I’ve now added a little something to it. I ordered extra ribbon from eBay and did the first set of mock ups last night.
What do you think?
Idea 1
Idea 2
Idea 3
The organza ribbon I bought is a pain to work with, so I may have to find a different type, failing that I could palm that job off to someone else! 😉
I took a picture of all three signature squares
Obviously these are only very rough as I just wanted to see what it would look like. I shall be backing the signature squares onto darker purple card and will probably print the squares themselves on the same pearlised paper I’ve used for the inside invitation sheets.
I can’t really decide which one looks best though. I do have a slight favourite but it would be interesting to see which one is your favourite…
So Idea 1, 2 or 3?
I’ve added a poll, oh it’s just like X Factor!!
Comment » | DIY, Stationery
October 20th, 2009 — 10:42am
I wasn’t going to include a map with my invitations. Nailcote Hall is in the middle of nowhere so it was going to be hard to scale a map to show the details of the country lanes around the hotel and where it was in comparison to the M42.
I have written down a series of directions for people and I know most guests will be using a Sat Nav, but the more I thought about it the more I really wanted to include a map. I spent most of the afternoon yesterday drawing this up to go on the back of the directions.
I’m quite happy with this!
Comment » | DIY, Stationery
October 14th, 2009 — 9:03am
It all started a good few months ago when I saw an invitation in a wedding magazine. Parts of the swirly design was raised and I thought it looked amazing! Realising this had been professionally printed and embossed I sighed and sulked, this was a look I could never achieve, right?
Then last week I saw a Real Life Wedding post on one of my favourite blogs and the couple had embossed a lot of their stationery.
I showed Suzie, telling her how much I loved it. Suzie then quickly set about sending me links to all this different embossing equipment. What? I can actually do this myself? I read a quick tutorial and realised this wasn’t as hard as I had first thought it would be!
So off I went armed with my embossing guru (Suzie) to Hobby Crafts and came away with everything I would need to have a go myself!
Here are my efforts
I love the effect of embossing, it’s so cute!
I found these examples too, which I think look fabulous!
Look at the map!
I’m definitely loving having something in a circle shape, maybe I’ve just found my outer wallet decoration?
Another effect I saw and LOVED! But seems even more unachievable than the embossing!
Amazing!
Comment » | DIY, Stationery
October 9th, 2009 — 11:03am
Because we are getting married!!
So the 1 year countdown is fast approaching and there are a few things that need to be sorted out. For one we need to send out our Save the Dates.
This was actually one of the first things I did after getting engaged. I designed our Save the Dates to be printed on to a magnet. I used Vista Print who were offering a really good deal of 25 free magnets (I actually brought 50… I’m not sure what I was thinking? So if you get more than 1 magnet, you know why!)
These are the magnets.
I have also designed something to go with them. It has our website on there so our friends can look up accommodation details and it also allows me to address the Save the Dates so not confuse who is invited. Because I was so proud of my New York skyline design I decided to use it in this. What do you think?
When Has comes home from India, we’ll start to send these out!
Only 22 days to go! 🙂
Comment » | DIY, Stationery
October 9th, 2009 — 8:43am
After seeing those gorgeous envelope liners yesterday I searched online (with Suzie’s help!) for fab and funky papers I could use.
Not really seeing anything I loved I thought I’d put my graphics skills to good use and create my own…
Hope you like it!!
Without invite
With invite
I think I will probably buy nicer looking envelopes as these are quite thin. Over all I’m really pleased! Yay!
Comment » | DIY, Stationery
October 8th, 2009 — 10:07am
I am in love with this idea, I think it might be a fab way to brighten up my envelopes. I am just unsure as to whether to design my own paper or source it. I’m having hard time finding any backing paper I like on the internet.
They seem quite easy to make, I found these instructions from the
Guardian website. May as well have a go!
Comment » | Stationery
September 30th, 2009 — 8:53am
Most bridal magazines you read will suggest “DIY-ing” as a way to save money, I on the other hand want to DIY because that’s what I enjoy. I’ve already made a start on the invitations and another thing I wanted to do myself was the favours.
My initial idea was to buy chocolates from New York, but quickly changed my mind. I wasn’t sure they’d survive the plane journey and to be honest most American chocolate is just a bit gross! I still wanted to continue the New York theme over to the favours so I designed my own wrappers! I’ve decided to bulk buy delicious Green & Blacks miniature chocolates and wrap them (with the help of my wonderful bridesmaids and mommy!) in these.
The ladies will have their chocolates presented in these.
 And the men will have theirs in these.

They are flat packed boxes which need to be assembled and decorated.
I really lucked out with the children’s favours, I found these adorable jars in
Confetti at a bargain price. They were heavily reduced because the jelly beans that were inside were coming to the end of their shelf life. I intend to fill them with either jelly sweets or chocolates like smarties.

I also had a go at making my own wine charms, hopefully I can get the staff at Nailcote to attach them to people’s glasses, else I’m going to have to pop them in the bags. I managed to make around 90 of these charms in a few hours. It was actually quite relaxing!
2 comments » | DIY, Favours, Stationery
September 24th, 2009 — 2:09pm
I absolutely love this from Pretty Wild, it’s a table quiz card.

It would be super easy to make, we could do ours to include questions about New York, films and music… all things Has and I love!
i.e, Name the film Bill Murray shouts “Nobody steps on a church in my town!” at a giant Marshmallow Man?
Answers on a postcard…!
Comment » | DIY, Stationery, Venue Decoration
September 23rd, 2009 — 10:46am
From the word go I knew I wanted to make my own wedding invitations. As a hobby I make cards and I work as a graphic designer. I’m very critical of my own work and have high expectations. I feel like people will also be expecting something great considering my background and I want people to be “wowed!”
I started of by searching for styles I like and came across these.

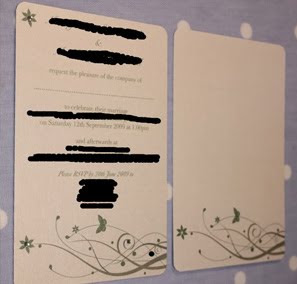


I have experimented with a few designs, I like the swirls and the wallets I can slot extra information into. So far i’m 99% sure I have the wallet and inside swirl design I like, but I’m still looking for inspiration for the outside.
I’ve used a Pearlescent A6 pocketfold wallet in “Morphing Mauve” from PDA Card & Craft and ivory pearlescent card from Staples to print the design on to.
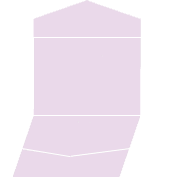 This is the layout of the invitation
The main part of the invitation will sit at the top and the extra information such as directions and RSVP will slot into the bottom.
After 6 different designs, 3 different styles of wallets I think I may have finally found an invite I like!
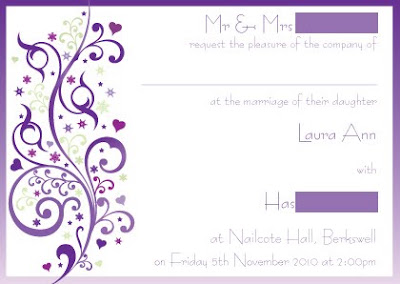 I intend to place tiny flat backed pearl in between the swirls and perhaps use them on the front design as well.
Comment » | DIY, Stationery